Posted by Simon Long Feb 24, 2010
A Simple VMware ESXi Rapid Deployment System – Part 2 of 3
Introduction and Requirements – Part 1
Customising and Optimising – Part 3
Testing The PXE Boot System
Now that the PXE Server is configured I quickly made a VM in VMware Workstation to deploy ESXi to using the settings in a previous post I wrote.
Here are the steps and settings I used.
- Create a Virtual Machine, Custom
- Workstation 6.5-7.0 Hardware Compatibility
- VMware ESX, ESX Server 4.0
- Number of processors: 1
- Memory: 2048
- Host-Only Networking
- LSI Logic,
- New disc, SCSI
- 30GB, pre-allocated, single file
- Customise hardware, remove: soundcard, USB, floppy – Set execution mode to: IntelVT-x — Customise hardware, add: 5 x Network Adapter’s (Host-Only Networking)
- Edit .vmx and add the following
- ethernet0.virtualDev = “e1000”
- ethernet1.virtualDev = “e1000”
- monitor_control.restrict_backdoor = “true”
PXE Booting the ESXi ready VM displayed the default deployment menu that is shipped with the V-PXEServer application.
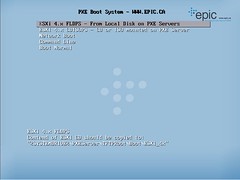
Selecting the highlighted option sets off the installation. The whole installation was still pretty slow due to running both the PXE Server and the ESXi Host on my laptop.
Exporting the ESXi Rapid Deployment Server to vSphere
To get the Virtual App to work on our vSphere platform I needed to Export the Workstation Virtual Machine into my vCenter. You could also use VMware Converter for this, but I didn't have this application to hand.
To Export the Vmware Workstation Virtual Machine I used the following steps:
- In VMware Workstation select File > Import or Export
- In the Convertion Wizard click Next twice
- For Source Type select Other from the Dropdown menu and click Next
- Browse to the location of the .vmx file of the V-PXEServer Virtual Machine and click Next
- Leave convert all disks and maintain size selected and click Next twice
- Select VMware Infrastructure Virtual Machine from the Dropdown menu and click Next
- Enter in your vCenter or ESX Host creditials and click Next
- Enter the desired name and location for the Virtual Machine and click Next
- Select the Host you wish to deploy the VM to and click Next
- Select the Datastore you wish to deploy the VM to and click Next
- Select the Network you wish to connect the VM to and click Next twice
- Click Finish to start the Export.
Once the Virtual Machine was added to the vCenter inventory, I double checked the Virtual Machines settings to make sure everything was correct. When I was content with my settings I powered on my Deployment Server. While it was booting, I created a new Virtual Machine to deploy ESXi to.
I PXE booted the new test VM and selected to Install ESXi4, It worked like a dream! The full deployment from start to finish took on average 15 mins including Reboot. Result!! This is more like the performance I was looking for. But still, I wanted to see if I could reduce this anymore.
Customising and Optimising the ESXi Rapid Deployment System – Part 3
