Posted by Simon Long Nov 9, 2020
Getting Started With Oracle Cloud VMware Solution (OCVS) – Deploying The SDDC With HCX
Following on from my recent post; Getting Started With Oracle Cloud VMware Solution (OCVS) – Deploying A Bastion Host which documents the steps needed to deploy a bastion host on Oracle Cloud, that will be used to access our OCVS SDDC. We can now deploy the SDDC, including VMware HCX (optional).
Posts in this series:
- Deploying A Bastion Host
- Deploying The SDDC With HCX
- Deployment Overview
- Networking Configuration
- Connecting To Oracle Cloud Infrastructure Services
- Connecting To An On-Premises Environment
- Migrating Workloads Using VMware HCX
As you will see, the deployment process is very simple and straightforward. Once we have successfully deployed the SDDC and HCX, in the next blog post in this series, we’ll take a closer look at how the solution is deployed within Oracle Cloud.
Prerequisites
- SSH Keys
During the deployment of our bastion host, we created a set of keys (public and private) that were used to access the bastion host via SSH. The same approach is used with the ESXi hosts in the SDDC. Instead of providing a root password, we need to supply our public key.
Deploying the SDDC

- Login to the OCVS console
- Select the correct Region that you wish to deploy the OCVS SDDC into. (This should be the same region that the Bastion host was deployed into)
- Click on the burger icon at the top left of the screen to display the menu
- Scroll down on the left-hand side menu and select VMware Solution

- Click Create SDDC
- Name the SDDC (I named mine tshirts-sddc)
- Select the correct compartment from the dropdown
- If you do not want VMware HCX to be deployed, uncheck Enable HCX
- Select the VMware software version you want to deploy. The current options are vSphere v6.5 U3 or v6.7 U3. (After the initial deployment the customer manages the vSphere software lifecycle on the SDDC)
- Select the Number of ESXi Hosts to deploy in the SDDC (Additional ESXi Hosts can be added at any point after the deployment)
- Enter a Prefix for the ESXi hosts. (ESXi hosts get named, <prefix>-1, <prefix>-2,<prefix>-2)
- Upload or Paste in your public key
- Select the Availability Domain from the dropdown (Make sure to deploy the SDDC on the same AD as the Bastion host we deployed in the previous post)
- Click Next

-
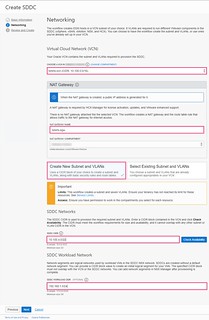
- Select your Virtual Cloud Network from the dropdown
- If you chose to deploy VMware HCX, name the NAT Gateway (The NAT Gateway is required by HCX for license activation, updates and VMware enhanced support)
- Select the correct compartment from the dropdown
- Ensure Create New Subnets and VLANs is selected (All of the networking will be automatically created and configured)
- Enter an SDDC CIDR (I used 10.100.4.0/22. This CIDR block will be carved up into smaller subnets, each used for different parts of the deployment)
- Click Check Availability to make sure the CIDR you entered can be used
- Enter an SDDC Workload CIDR (This is optional, I used 192.168.1.0/24 which will be used for my workload virtual machines)
- Click Next
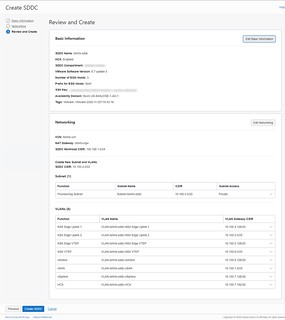
- Review and amend if needed

-
- Click Create SDDC
The SDDC build process will now begin and should take approximately two and a half hours. During this time, you can observe the provisioning process via the Oracle Cloud console.

Reviewing the SDDC Configuration
Now that we have completed the deployment of our OCVS SDDC, let’s move on to the next blog post of this ‘Getting Started with OCVS’ series; Getting Started With Oracle Cloud VMware Solution (OCVS) – Deployment Overview and review what’s been deployed.
